1.-Open Outlook
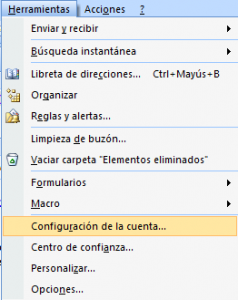
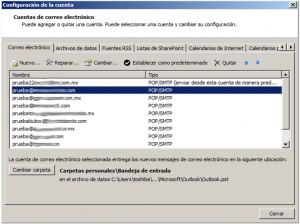
2.- Go to Tools / Account Settings
En la nueva ventana que le aparecerá debemos dar doble clic en el botón “Nuevo…”.
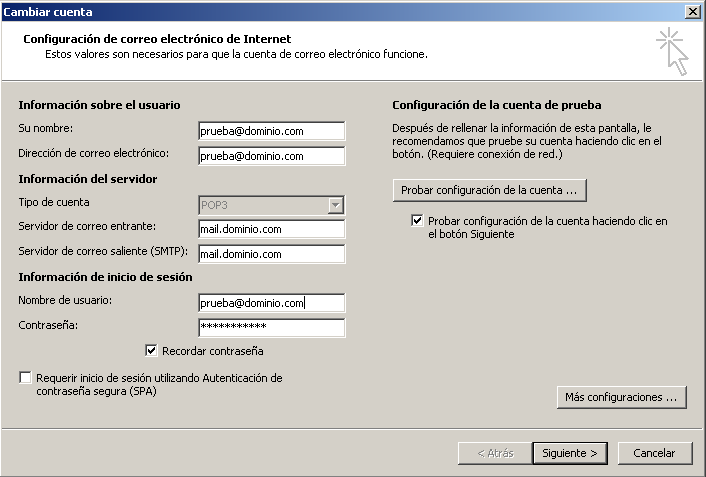
We must verify that the settings are correct.
If everything is correct you must click on "More settings ...".
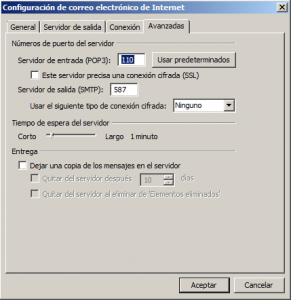
Check the following settings in the "Advanced" tab.
Once verified, click on accept to return to the previous window.
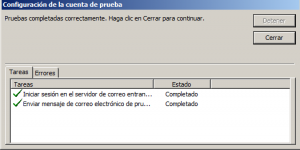
Antes de dar clic en “Siguiente” de clic en “Probar configuración de la cuenta”
If everything appears green, click close.
You will return to the previous screen, click on "Next" and then on "Finish". With this, your account is configured. If you wish, you can download this manual by clicking on the following link:
http://www.kiubix.com/sistema/dl.php?type=d&id=17
For other versions of Outlook the configuration of the servers and ports is exactly the same, you just have to follow the following steps to access this menu.
Microsoft Outlook 2002 (XP) and 2003
- From the Tools menu, select E-mail accounts.
- Click on the circle beside View or change existing email accounts. PressNext.
- Click on the email account you want to modify and then click on Change.
- In this window check the account settings
- Tap on More settings.
- Selecciona la pestaña “Avanzadas” y en la opción “Servidor de salida (SMTP)” pon el puerto 587.
- Press To accept.
- Press Next.
- Tap on Finalize.
- From the Tools menu, select Accounts.
- Click on the tab Mail.
- Click on the email account you want to modify and click Properties.
- In this window check the account settings
- Click on More settings.
- Selecciona la pestaña “Avanzadas” y en la opción “Servidor de salida (SMTP)” pon el puerto 587.
- Click on Apply in the dialogue box Properties to confirm the changes and to close the window.
- Click on To close in the dialog Internet account to complete the configuration change.
- Tap on To close.
- From the Tools menu, select Accounts.
- Click on the tab Mail.
- Click on the email account you want to modify and click on Properties.
- Check the server settings.
- Check the box next to the option My server requires authentication.
- Press the button Setting .
- Verify that the outgoing server (SMTP) has 587 configured
- Click on Apply in the dialogue box Properties to confirm the changes and to close the window.
- Click on To close in the dialog Internet account to complete the configuration change.
Note: Make sure that no esté activada la casilla “Iniciar sesión con la autenticación de contraseña segura”.





No Comment