CONFIGURATIONS BEFORE YOU START USING YOUR SYSTEM OF DIGITAL VERIFICATIONS (SICOFI).
Una vez que haya ingresado a su cuenta para comenzar a usar su sistema de facturación, primero debe hacer algunas configuraciones adicionales a las que realiza la empresa KIUBIX, esto para que comience a funcionar de manera correcta.
– Dar de alta tu Certificado de Sello Digital y el firmado de tu contrato
Para ver ese apartado en tu apartado de inicio>>perfil hasta abajo encontraras la siguientes dos opciones:
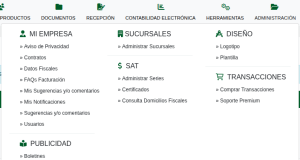
Así mismo para el certificado podrás encontrarlo en ADMINISTRACIÓN>>SAT>>Certificados
Aquí deben subirse los archivos proporcionadas por el SAT a usted o a su contador.
-Este apartado es para subir el sello digital.
——————————————————————————–
-Este apartado es para subir el contrato.
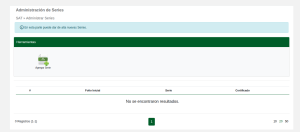
– Una vez agregados se va a dirigir al apartado de ADMINISTRACIÓN>>SAT>>administrar series
Le dará en el botón de Agregar serie
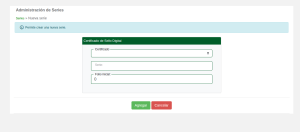
le mostrara una ventana donde deberá colocar los datos que le pide a continuación:
*Certificado: en esta opción deberá elegir el certificado dado de alta con el que se empezara a facturar y al que se le asignará la serie
*Serie: This option refers to whether you want to add any additional letter or word to the invoice #. I considered that it is only optional, that is, if you like to put a series you can put it, if you do not want to have a series it is not mandatory and does not affect the system at all.
An example would be, we suppose that the RFC of our company is ZXZ010101Q32 and we want our invoices to have the first 3 letters of the RFC as standard, then our series would be ZXZ.
* Initial Folio: It is the option to place the initial number with which the account of your invoices will begin.
If you want your digital invoices to give continuity to the printed invoices then you have to place the next number of the last folio in
printed invoices.
For example, suppose that my printed invoices stayed at folio 550, then my initial folio in electronic invoicing will be 551. This is optional, since if you want your digital invoices to start with the count from 1 then you just have to place the number 1 in the initial number of the folio.
Uniting both the terms SERIES and INITIAL FOLIO, we assume that:
Our first invoice issued would have folio ZXZ 551
Our second invoice issued would be ZXZ 552
Our third invoice issued would be ZXZ 553
Thus consecutively, the SERIES is fixed and it will always be the same while the FOLIO changes numerically.
d) Once you have placed the SERIES and INITIAL FOLIO, click on the bottom button that says ![]()
With this procedure you have added your initial folio correctly.







No Comment